Easy DIY 2 Seater Porch Swing
- Outdoor DIY Projects
- April Wilkerson
- Updated: March 8, 2023
It’s funny because over the past two years I have made 7 porch swings for either friends or family but I’ve never made one for myself. I finally decided to make myself a swing.
This might seem like a big project, but it is actually very simple and doable even for a beginner. I’ll be throwing in alternatives to tools so even if you don’t have a shop full of tools, you can make this swing with just a jigsaw and a drill.
I make all my swings from cedar because it’s a wood that is naturally rot resistant. So if you left a cedar board outside untreated it would hold up longer than something like pine. However, cedar is more expensive so you can purchase pine instead and follow all the same steps. If you go the route of building it from pine, you just have to make sure to seal it really well and often.

1) I sanded the back side of all my boards. Cedar is very powdery so be sure to wear a respirator.2) I took the templates and traced them on my boards until I had the correct number of each piece. You will need:


Note: The footer is not included in templates since it’s a big rectangle however the dimensions are 43″x 2 3/4″3) Once I had everything traced, I cut it all out using my bandsaw.
Alternative: If you don’t have a bandsaw you can use a jigsaw.
Tip: In each group, I made sure to cut one as perfect as possible, then just rough cut the remaining so that I could use a flush trim bit to get them identical. (Here is a video I put together explaining a flush trim bit)
Alternative: If you do not have a router, or a flush trim bit then just take your time cutting out all the different pieces with the jigsaw.(The footer is not shown)
4) Next I went to the drill press with the arms and first used a 7/8″ paddle bit to drill a hole that will later be used for the chain.
Alternative: If you don’t have a paddle bit then use a regular drill bit to make a starter hole then use a jigsaw to cut the hole.


5) I also used the paddle bit to make a starter hole in the cup holder area so that I could get use a jigsaw to cut it out. 6) With all the pieces cut I put a round over bit in my router and went over everything except the bottom and back supports. On the arms I went over both sides but on the vertical arm support, cup holder pieces, and footer I only went over one side (make sure it’s the smooth side). Alternative: If you don’t have a router than don’t worry about this step. You can leave your pieces with the factory edges on them or you can take some sandpaper and ease the edges a little that way.
A carriage bolt is distinguishable because it has a build up of material in the shape of a square right under the head but before you get to the threads. So instead of just slipping it into into a hole and the head sitting flush like a regular bolt, you have to grab a hammer and give it a slight tap…just enough to get it started, then when you tighten down on the nut it will finish sucking that square build up into the wood and keep it from rotating when you tighten down on it.
I drilled a pilot hole on all of my holes with a countersink bit.
I used 1 5/8″ exterior screws throughout the entire build.

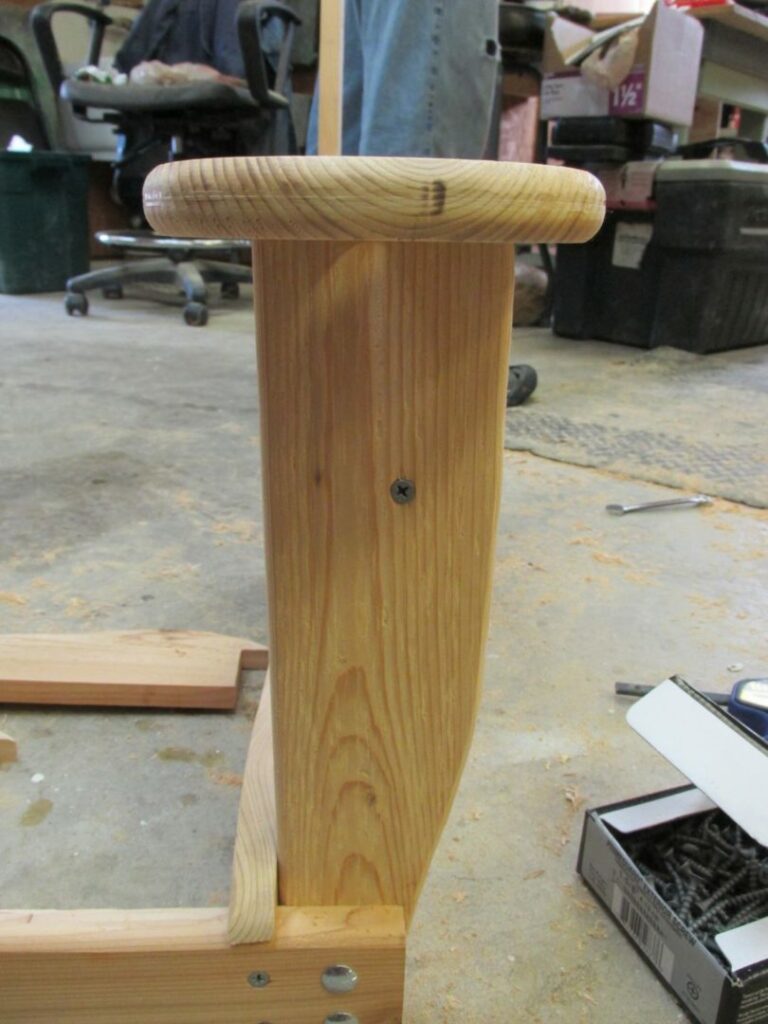
Next, I started joining things together. I first took the footer and one vertical arm support and lined them up where the bottom of the vertical arm support is flush with the bottom of the footer. Then I used the drill press to drill two 1/4″ holes.
Tip: After you drill the first hole, take a 1/4″ bolt and stick it in the hole you just drilled. This will make sure the holes stay aligned perfectly while you are drilling your second hole, which will prevent alignment issues when you’re bolting things together.
Alternative: If you don’t have a drill press just use your hand drill.

I placed a 1/4″ x 2″ carriage bolt in each hole then used a hammer to tap them into place. Then I put a washer and a nylon nut on each carriage bolt and tighten them down.
Next I joined the bottom and back supports. I would first grab one of each and align them so that their angles matched up with one another. Then I drilled two 1/4″ holes, again sticking a bolt in the first hole to keep it’s position while I drilled the second. Once all four supports were drilled, I would tap in the 1/4″ x 2″ carriage bolts then put on a washer, nylon nut, and tighten it all down.


Note: I assembled two back supports on the left side of the bottom support, and two on the right.

To join the bottom/back support to the footer, I used a speed square to make sure I was attaching it straight. Once the speed square was flush against the bottom support and the footer, I would hold it in place then use a screw to attach it. At this point I only attached the far left and right supports. I used two screws in each support.
Before attaching the arms I first took them to the drill press and drilled a hole in the back portion, in order to give myself a way to attach it to the back supports, then I put a 3″ carriage bolt in.


I lined the arm up so that the chain hole was just in front of the vertical arm support, then drilled a hole where the carriage bolt hit on the back support. I used a hammer to tap it into place then put on a washer and nylon nut.
Then I moved to the other side and repeated the steps.


13 ) Next, I screwed the front arm support in place by using two screws going in from the top.14) Then I attached the cup holder assembly. First by joining the bottom and back of the assembly, then by attaching it to the arm. 15) After attaching the other side the same way I moved the entire thing up to a taller work surface then attached the two middle supports.
When you are buying the boards to make up the slats you can either purchase 1×2 boards and use them as is, or buy 1×6 boards and use a table saw to cut them down to 1 1/2″. The advantage of doing it this way is a slightly lower cost, but also it’s easier to find straight 1x6s than it is 1x2s. However, either way works. I was able to find 5 straight 1x2s so I used those then bought 1x6s to make up the rest.
Note: You can get 2 slats from the 1x2s and 6 slats from a 1×6.

Before cutting any of the boards, I first went over the edges (on one side) with a round over bit. If you don’t have a router than just leave them as is or soften the edges with sandpaper.

I set up a stop block at my miter saw and started cutting my slats to length.
Alternative: If you don’t have a miter then use your jigsaw to make your cuts.

I started to attach the slats: I borrowed my husband drill to make this process go faster. I kept a countersink bit in one to pilot hole, and a Phillips in the other to drive in the screws. I attached the front slat first, then moved to the back and attached the very last one.


Then I went through and attached the rest, using a scrap piece of 1/2″ wood to make sure they were all evenly spaced.5) Once the seat was finish, I just started on the back and repeated the steps. I attached the bottom most slat first, then moved to the top and screwed in my top most slat then filled in the in between.
Alternative Design Option:
When I was making these for friends and family, I would sometimes put in a heart (when requested) to do this I would..
I grabbed the extra 1×4 and cut it length.


7) I grabbed a piece of paper and folded it in half, then drew half of a heart and cut it out. This way when I opened it up, it is symmetrical…8) I found the center of the board then traced it on then cut it out with my jigsaw.9) Then attached the rest of the slats until I was done.


1) To give the wood a little protection I applied a coat of Teak oil by Minwax.
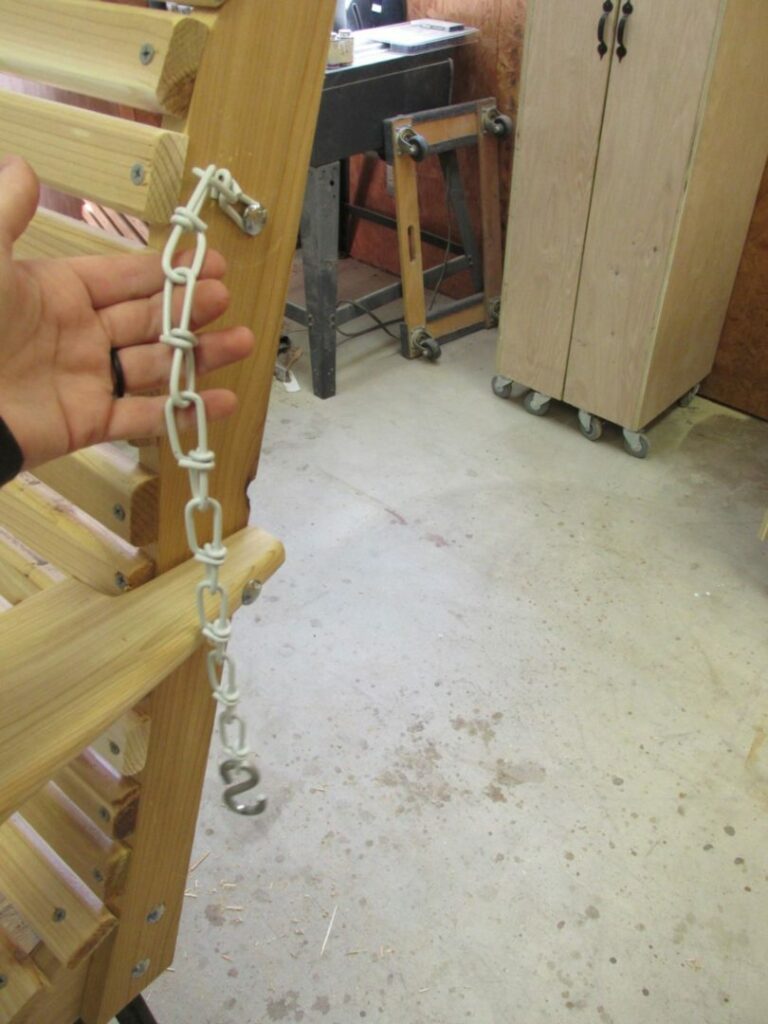
2) Once the swing was dry, I started to add the chain. I cut two lengths of 8 links each (each link is two loops) then drilled a hole in each side near the top. Then I attached the chain to the side with carriage bolt, washer, and nylon nut assembly.
Note: Before tightening down on the nut be sure the link is slanted like in the below photo.2) Next I divided the rest of the chain in two equal lengths and cut the middle then stuck them in their respected places on the footer. This chain goes through the hole in front of the cup holder.
Now you can connect the chains by way of a ‘S’ hook then find a spot to hang it.

My mom wanted their names put on theirs so I grabbed my soldering iron and burned in their two names.
This was a very simple simple project. If you are looking for a porch swing and are on the fence about tackling it yourself, I say go for it. Even if you don’t have a router or the two bits I used….you could build a swing with a drill, jig saw, and a 1/4″ wrench. Then you would be sitting on something you yourself built. <–very cool feeling.
Total Cost: $74
If you liked this project and want to stay up to date with what I’m building, then be sure to sign up for my email newsletter and you’ll get an email when I post something new. See you soon!
*UPDATE* I now I have a single seater swing build tutorial as well! You can find that here. I also sell templates to help make the single seater swing.
If you are interested in expanding the swing to be a two-seater, the only difference between the two is the size (length) of the middle support slats. You could take the template I have and easily widen the design by stretching the slats and adding in a center support on the back and bottom. Thanks!