How To Build A Patio Cover | Part 1
- Outdoor DIY Projects
- April Wilkerson
- Updated: March 5, 2023
Thinking about how to build a patio cover? Check out this DIY project where I walk you through the whole process!
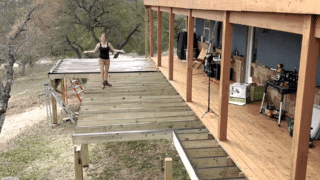
The south wall of my workshop is about 31’ long and borders the pool patio. Unfortunately, getting out of the sun can be a real challenge if we are hosting a lot of people since there is not a lot of covered patio space. Today I’m going to do something about that. I am going to build a 6’ x 31’ covered sitting area and basically walk you through the steps so that you too can be empowered with the information needed to get out there and build one of your own.

I’ll start by clearing up some lingo real quick. I’m not sure if it’s a southern thing or what but I have been calling this thing an “awning” when talking to some of my friends on line; most of which are not from the south. Come to find out, the correct jargon is “verandah”…..which to me, sounds a lot like a brand of women’s eye shadow or something : ) Nonetheless, this thing is getting built, and as the builder, I’m gonna call it an “awning”. : )
Hammer Drill
Small 12v Drill
6×6 Post Brackets
Concrete Anchors
Superjaws
Circular Saw
Tinted safety glasses
Hearing
Dewalt saw horse
Joist hangers
Multi tool
Sawsall
Milwakee nailer
Arrow stapler
Roofing Paper
Roofing Shingles (Mine are brown)
Spray Adhesive
Hooked Box Blade Cutter
Roof Shingles
Initially I took the time to understand exactly how I wanted the awning to attach to the building. As I saw it, I had the choice of either butting up directly to the existing building eave, going directly underneath the building eave, or tearing into the building eave and attaching to the main structure directly.
I chose the latter of the options so that the new roof line would not be shared with pre-existing construction and the transition from the barn on the roof would flow right into the roof of my awning through one smooth roof valley.

With that out of the way, first things first: tearing out the old fascia board, roofing material, and exposing the rafters. I recently had a new roof put on this building so some of the brand new construction material needed to be removed. With all of the drip edge, roofing tiles, and roofing paper pulled back and out of the way, I ripped out the ceiling decking, fascia board, and sub-fascia board. The sub-fascia was a 2×4 and was attached to the end face of the building rafters. This thing was a real bear to remove but was the last piece before I was able to move forward.

At this point, all of the building rafters are exposed and I could finally get a good look at how my new addition would lace into the existing building. The set-up is just about perfect. All of the building rafters are on a 16” layout. My plan is to attach my awning rafters directly to the building rafters and let my awning rafters rest on the top of the building wall plate.
As I mentioned before, I want the covered space to be six feet wide. The edge of the awning closest to the pool needs to have about 6’5” worth of overhead clearance…I chose this number because I can’t think of one person I know who is taller than about 6’3”. Consequently, the roof pitch measures out to just over 2/12, which is the minimum pitch for the roofing tile I am using.

I mounted all four of my posts exactly 6’ from the building out on the concrete patio. To mount the posts, I used some Simson Strong Tie post mounts which take a 5/8” concrete lag bolt in the bottom to secure the plate to the concrete and some exterior wood screws to attach the bracket to the post.
Although the brackets are intended for a 6”x6” post, the inside dimension of the bracket is about 5-1/2”. Consequently I notched each posts enough so the post sat inside the bracket nice and snug. Ultimately, I will be building out trim work around the base of the post so the bracket will be covered up when it’s all said and done.

The patio deck is not level by any means; it actually has about a 5-degree slope to it. To account for this I simply put an angled cut on the bottom the post with a cross cut saw. This allows the post to naturally rest in the vertical position. Before the post gets permanently placed in the bracket, I temporarily stood it up straight in the bracket, then measured up from the patio deck to 77” and made a mark on the post. This mark will represent where my cross beam gets attached. The cross beam is eight inches tall and is flush to the top of the post; so then my first post gets cut at exactly 85”. Again, this gives me an overhead clearance of 6’5” at the bottom of the cross beam.

Before cutting the post to length, I cut in a notch for the cross beam to rest on. I’ll admit this was quite a bit of fun. I set my circular saw depth to 2” then just made multiple passes through the side of the beam. After about 20 or so cuts over an 8” span, I just hammered the skinny pieces loose and then chiseled them out until I had a nice little notch for my cross beam to rest on.


In order to cut this thick material, I used my circular saw to cut all four sides as deep as the saw would go then made the final cut with a cross cut saw. I now have 4 pieces of 6×6 scrap to find a good project for : )

Finally, the first post got stood up, leveled, then screwed into position. Now it was time to focus on the next post. The bottom of the next post also got a small angled cut, and a notch for the 2×8 cut into place. The notch for the second post was located by projecting a level line from the first post to the second post where the crossbeam attaches. I actually used the 2×8 beam for this but a line level would also work.

After the second post is put in position the first 2 x 8 beam can finally go up in the air. The end of the beam on the second post stops in the middle of the notch so that the next crossbeam can butt up to the other side of the notch. At the first post, I left the overhang attached on the 2×8 beam so that I can cut it at a later time. I repeated this pattern until all three 2×8 beams were in the air and all posts were in position

Initially I thought I wanted to use cedar 2×6’s on 24” centers as the rafters. For a couple of different reasons I decided to go with 2×4’s instead. Once I had the sub-fascia out of the way and saw that the building rafters were on 16” centers, I decided to make matters a bit easier and do the same by sticking to a 16” layout.
I did not start the rafters at the very end of the building. I began by coming back off the end of the building and beginning my rafters on about the 3rd building rafter. This is because I knew I did want at least the end rafters to be cedar 2×6’s just for the appearance.
My first rafter went in pretty easily. I simply measured from the cross beam to the top plate of the building wall to the cross beam and then added two inches for over hang at the top plate. Of course I made sure the posts was good and level before taking a final dimension (up until this point, the posts are free to move just a bit since they are only captured at the base).

Each rafter gets a small cut on the end to account for the pitch of the roof. Using my speed square every time, I would set the angle of the cut to just about the 2 mark on the “common” scale of my speed square. See the pic below if you’re not clear on what I’m saying here.

The top edge of the rafters all got set flush to the top of the cross beams. To hold the rafter in place I decided to use joist hangers (aka hurricane clips). I am not the best “toe nailer” there ever was so I figured I would play it safe and use some brackets to get a good hold on these rafters.

After stuffing the rafter into the small space above the top plate of the building wall, the rafters got screwed to the building rafter tail. The opposite end of course is held in place with the joist hanger. After completing the first one, I was feeling pretty good and laid out the 16” marks all along the length of the cross beams so I could easily glance up and see right where my rafter needed to be placed. To be clear, these rafters are placed 16″ measured from the center of one rafter to the center of the next. : )

I had a grand total of 24 rafters in the air. For some, that would probably go pretty quick. But I’m a “newb” at this kind of stuff and just these rafters alone took me several hours to cut and install. I also got my first taste of really getting to drive in a boatload of nails. Even though I was borrowing my husbands 22oz framing hammer (which was way too big for me) I was able to get into a groove and only had a couple of bent nail casualties by the end of the day : )

Last point on rafters: It would have been easy to get into a groove and just cut every single rafter to the same dimension and just nail it up there. Since I am nowhere near a perfect carpenter, I took my time to measure out the gap between the beam to the building as I went to make sure the beam was staying a constant distance from the building.
The last two end rafters (also known as “rakes”) are more or less facial boards since they do not really have any structural value. All of the rafters other than the first one and the last one rest on the top plate to the building wall and are also “sister’ed” up against a building rafter tail. The end rafters are basically held in place with “dead wood” which is cantilevered off of the building to create an eave.

Remember how I left the ends of the first cross beam long? I left them long because I knew my end 2×6’s would require some figuring when it came to mounting them in position. Once I finally had all of the details worked out on the placement for the 2×6, I simply flush cut the 2×8 beam to the edge of the 2×6. The inside corner of the 2×6 and 2×8 got reinforced with a Simson corner bracket to finally wrap up the end section.

Roofing – Yuck : )
Nobody likes roofing…..except for me lol. I was pretty thrilled when I finally got to the point where I could toss up some roof 5/8″ decking and take off with putting the roof on. It made me feel like I was really getting somewhere.

As you might expect, the roof decking is a pretty straight forward process. I placed the roof decking of the awning to directly up against the roof decking of the building. This is the part where I really had no choice but to lean on the help of my husband to help lift this stuff onto the structure where I could then nail it down. We had a pretty good system going too; I would call out the dimension of the piece of plywood, and he would cut it to size and hand it up to me.

I used my nail gun with some ring shank nails to hold down the sheets of OSB. Because I paid such attention to detail on the placement of the rafters, there was very little “fudge” work when it came to cutting the plywood to size. The ends of the plywood consistently landed on the middle of a rafter just like I hoped.
Note: If you are repeating this project, be sure to stagger or “offset” the joints of the plywood on each “row” of plywood as seen below.

Instead of the traditional tar paper typically found on roofs, a contractor friend recommended I use a synthetic roofing paper which was much more durable than tar paper. Additionally, the synthetic paper is much lighter and easier to work with. I started on the down hill edge of the rood and secured the paper in place using a hemmer-stapler. The stapler made quick work of securing the paper as I worked up toward the building.

When putting down the roofing paper, the only real trick is to make sure that the uphill layers overlap the down hill layers. When you come to the end of the structure, simply flush cut the end of the paper to the edge of the roof decking.
Note: be sure to leave about an inch or so of material free of nails or staples near the edge so that the drip edge can slide underneath it.
As you guessed it, the drip edge goes on last all around the perimeter of the roof. I installed a brown color drip edge to kind of match the brown color of the roofing tiles.

Finally, I get to start throwing down some roofing tiles. You may already be aware that the roof on my barn was completely updated with a terra-cotta style roofing tile made by a company called “Onduline”. The material is made from recycled material and is pretty easy to work with. It comes with a lifetime guarantee, smells a bit like dog treats dipped in tar, and is really pretty from nearly any angle.
Once again, I started on the down hill side….which kind of reminds me of an old chant that helps me to keep roofing and other exterior projects straight when it comes to water proofing: “on top is in front and below is behind” ….This loosely translates to anything that is up high is generally going to be on top of anything that is below it to ensure water runs on top of and off of whatever you’re working with. You can imagine that the opposite arrangement would catch water rather than shed it.
The first row of tiles that get installed get a foam lining glued to the underside for protection against varmints and critters that want to take roost under my tiles – I don’t think so! This foam lining gets set back a bit off of the edge of the tile since I am going to have a 2” over hang past the edge of the roof decking.


I started the tiles by setting my 2” over hang, made sure it was nice and straight, then sets screws in the peaks of all the corrugations (which will be referred to as “humps” moving forward in this tutorial), and left the very last hump free of a screw. The last hump gets a screw put in once the next tile overlaps the last hump. The first hump of the next tile overlaps the last hump of the previous tile as you see in the image below.

The entire front row of tiles all get the exact same treatment except for the very last one. The only difference with the last one gets cross cut so that it is flush to the 2×6 facial board.
Moving up the hill is also very straight-forward. However, the first piece gets one full corrugated section cut off so that all of the “left to right” overlaps are staggered. Fortunately the tiles also have “ribs” molded in the shape which are used for aligning the “top to bottom” position of the tiles. However, it is important to measure the positioning every once and a while to ensure the placement of the tiles does not gradually drift and then you wind up other problems due to misalignments.

The pattern of overlapping the last hump and aligning the top ribs continued through out the entire roofing evolution. Once I started to encroach on the valley between the existing roof on the barn and the new awning roof, there were a couple of adjustments that I had to make.
The tile company, Onduline, makes a molded piece specifically for making this kind of transition near something like a barn roof eave. This piece is called an “apron” and slips under the barn roof tile and goes on top of the awning roof tiles. …*remember – “on top is in front and below is behind”. When the apron piece is slid into position, the last and upper most tile of the awning roof is then slid under the apron but is still on top of the tile below it.

As you might imagine, the roof was not originally dimensioned with perfect spacing of the tiles in mind. Consequently, the upper most tiles need to be trimmed to correct height. In my case, the tiles got cut down to about 11” tall and were cut with my trusty circular saw.

Note: Although cutting these with a circular saw is super easy, you can go ahead and plan on it wasting the saw blade when it comes to the blade giving nice smooth cuts through wood. Because of this I used an old blade that came on the saw when I first got it.
Just like the rest of the tiles, the apron and upper most tile all get screwed into position with the supplied screws from Onduline. It is worth mentioning that these screws come with a preinstalled washer that is rubber coated on the underside and is also paint matched to the roofing tile.

The last and final pieces of roofing material to go up are the corner pieces. Woo hoo! The corner piece can take the place of drip edge in terms of water proofing along the sides of the awning. Of course the same cannot be said about the front.

Installing the corner pieces is very straight forward…..just align the inside corner as the left to right reference and then align the ribs as the top to bottom reference and then stick them in place with the screws. Naturally you will want to make sure the higher pieces overlap the bottom pieces for water proofing.

I must say that I am REALLY like the way this roof turned out. I have very little experience with this kind of work so I was happy to have the challenge of navigating through al of the little challenges along the way. Tune in next week for the second and final part of this project where I tackle the ceiling decking, add some recessed lighting, and put the finishing touches on this new awning…..or verandah….which ever you choose : )
Thanks for stopping by and take care.


