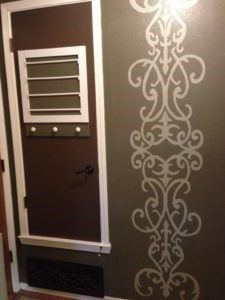
Easy DIY Drying Rack
- Home Decor DIY Projects
- April Wilkerson
- Updated: March 9, 2023

The function of these hangers are awesome. Each horizontal rod is able to move independently from one another, and once you take the clothes off, you just move it back flush against the door until next time. The downfall is….well, they’re hideous.
So looking around Pinterest I ran across THIS!…instantly fell in love and was set on making one for myself. However, after thinking it through I was not willing to give up the function of the uglies (metal hanger) and also didn’t like how far off the wall this design stuck out especially since I don’t have a large space.


Since Step by step instructions are already out there for the majority of this build, I’m just going to be providing detailed steps for the tweaks I made. If you have questions though, just leave me a comment and I’ll give more.
1) I cut the background, the frame, and the 3/4 inch dowel rods to size. Since mine wasn’t going to be leaning forward, I went ahead and primed and painted all pieces before nailing it together. I would highly recommend you doing it this way unless you are going to be using only one color.
2) After a quick discussion with my awesome Dad, I discovered the hinge I needed was a called a piano hinge. Found at Home Depot for about $8. It comes in a long strip of about two feet, which of course is too long. So I took it and with the help of my vise and hacksaw, was able to cut to length four different hinges.

3) Next I got the first dowel rod, turned it vertical and stuck it in my vise to hold it in place. Then I drilled a pilot hole in the center of the end. … if that makes sense. …try to position the pilot hole directly in the middle because there is a good chance it could split and then you will have to start with a fresh rod.

After you get the pilot hole drilled, take the hinge and the screw that comes with it and attach it like so…

4) Now I took the rod and hinge over to the frame and repeated the process. Drill the pilot hole in the frame then attached the hinge. You’ll see in the below photo that the length I cut the hinges only leaves one screw hole per hinge. I wanted a little more support, so I drilled another hole right below it and gave each hinge two screws.

BAM! One rod down. Just repeat for however many rods you want yours to have.
5) Paint the rods and hinge. Since the hinge is metal, I used Rustoleum metal spray paint in white.
6) At this point everything worked perfect, but I noticed that when I closed the rods, they had a slight droop to them. To fix this problem I cut some small square pieces and used my nail gun to attach it to the far side of the rack to create a lip for the rod to rest on when closed.

Note: I built this dry rack with the intentions of only using it to hang my underwear, bras, and workout shorts on. All light weight stuff. These rods will not support the weight of jeans or winter sweaters and such. If you are wanting something that will be able to handle those things then the original design will be your best bet.
Total Time: 3.5 hours
Total Cost: $16.00
8 Responses
VERY nice!
Great project, and what a lovely finish. Found you on the Homestead Barn Hop, and am following you now! Best wishes from the UK and let me know if you would like to guest post any time at my blog, Mumtopia.
Thanks for the compliment that just makes my day. I’m new to the blogging world, so I don’t even know what all a guest post entails, but if you think one of my projects could benefit some of your readers then that would be great!
Wow I am impressed. I have the same over the door hanging apparatus that you talk about. The uglies. But there is no way I am crafty enough to do what you did, however April I may do as you and amend this to my way. Thanks for posting. Over from Kathe’s.
QMM
Thanks Peggy! : ) Yay, it makes me happy to think of somebody being able to benefit from my instructions so I really hope you make one. If you have any troubles or questions, just get in touch with me and I’ll help.
Very cool! Visiting from Sarah’s homemaking linkup.
I’ve been wanting to try something like this every since I saw that same pin on Pinterest! Thanks for posting :)~Kaitlin @ Life’s Little Mischiefs
It looks great – and so does your paint job! Pinning to Pinterest. 🙂
Comments are closed.