DIY Chevron Stripe Bookcase
- Home Decor DIY Projects
- April Wilkerson
- Updated: March 8, 2023
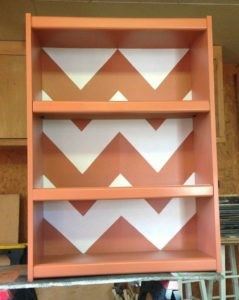
Thinking about doing a DIY chevron stripe bookcase project? Check out this DIY where I took an old bookcase and added chevron stripes!
The same friend I refinished those barstools for had a bookcase that was in need of a slight facelift, so I took it home and after paying it a little attention it came out looking like this…

Yay! I just think it’s gorgeous.
The bookcase is a typical inexpensive bookcase that is made up of particleboard and veneer so I had to be careful but at the end of the day it turned out looking great. Below are the steps on how I did it.
1) The first thing I did was go over the entire thing with 180 grit sandpaper in order to rough it up some so that the primer would have something to hold onto. If yours also has a veneer then make sure to not sand a hole through it. Just give the unit enough of a scrub down to scratch the surface slightly.

2) Next I took a damp cloth and wiped the unit down to remove all the dust I just created.
3) Then I put two coats of oil based primer down and let it dry over night. Note: See my refinishing barstools post to understand why I chose oil based primer. Oh, and remember if you use an oil based primer then to use a natural bristle paint brush.
WilkerDon’t: So since I planned for the bookcase to be orange with orange and white chevron stripes, the next thing I should’ve done was paint the background white. However, I got excited and forgot so I ended up creating more work for myself then needed. So if you are doing this project then before moving to the next step make sure you first paint the back with the accent color.
4) This bookcase measures 38 3/4″ x 28 1/2″ and conveniently has a vertical seam right down the middle that splits the back piece into two equal parts. I took So Simply Chic’s approach and made boxes first then went back and drew in the lines that would create my stripes.
The first thing I did was split the two halves of the back into quarters by drawing two vertical lines. Then, since I wanted the stripes to be about 8″ tall, I marked off every 8″ on both the left and right side then went back with a straight edge and made the horizontal lines. The last thing is to made the diagonal lines that will make up your Chevron stripes.


So just remember that with a little bit of paint and patience, that boring piece of furniture can turn out to be something spectacular. So go ahead and pick it up if you see it on the side of the road, or Goodwill, or even cheap on Craigslist.
Happy Paintin. ; )
Total Time: 2 days (includes dry time)
Total Cost: $29