Building A Giant Bandsaw Mill | Part 1
- Metal DIY Projects
- April Wilkerson
- Updated: March 4, 2023
Thinking about building your own giant bandsaw mill? Check out this cool DIY project where we built a giant slabbing machine!
About two years ago, Matt Cremona designed and built his own bandsaw mill in Minnesota. At an event last summer (that I attended with Matt Cremona, JD Brewer and Johnny Brooke), I got the idea to bring the guys down and replicate the build here at my place in Texas. It took Matt 4 months to build it all by himself. The team and I have given ourselves 5 days. Challenge accepted.

ISOtunes Bluetooth Hearing Protection
Cermet Blades
Wilker Do’s Chop Saw Station Plans
Triton SuperJaws
Ridgid Octane Drill
3D Modeling Software
Plasma CNC Table
Weld Tables
Metal Marking Pencil
Lincoln Power Mig 260
Lincoln Power Mig 210
Welding Hood
Welding & Grinding Hood
Welding Jacket
Welding Gloves
Welding Cart
Cordless Grinder
Fireball Squares
Laser Measure
Bessey Quick Clamp
Bessey Duo Clamp
Bessey Rapid Ratchet Clamp (my favorite)
Bessey Small General Purpose
Bessey Inline Handle
Bessey Classic Heavy Duty
Matt Cremona’s Bandsaw Mill Plans
Before jumping in to the build let me first explain what a bandsaw mill is and the prep work that went into the few weeks leading up to the guys arriving. A band saw mill is a piece of equipment where you can lay a log on its bed and slice it into slabs.
This photo is of Matt Cremona’s mill.

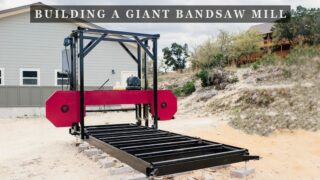
This is an alternative to using a chain saw mill, which I showed you a few videos back. You can certainly buy a large band saw mill right off the shelf, however they are extremely expensive, and most certainly are not going to be made as well. Because I know it will be asked, something with this cut capacity goes for around $75,000, and I was able to build this one for just under $16,000. It has a 76” wide cut capacity, 12’ long. It is more than likely larger than anything I’ll ever be cutting here in the south but since I was going through the effort of building one from scratch, I’d rather be over what I’ll need than under.
This was a huge project to tackle in just a week even with four of us. Luckily after Matt built his band saw mill he produced a set of plans for it. And he was kind enough to send me a set beforehand so that I can start preparing for it.

This meant that I was able to order all the hardware, parts, and steel needed for this project ahead of time. The two weeks leading up to the guys arriving at my place was dedicated to getting done anything that could be done beforehand to make the build go smoother.
Which included sorting all of the hardware for the individual steps. See, when I ordered every single nut and bolt needed for this project, it showed up in a giant box. So my assistant Erin went through and counted out the quantity needed, grouped together, and labeled the hardware for each portion.


This way whenever we got to lets say, the saw head, we could go directly to the box that was labeled saw head, pull it out and have all of the hardware needed for it.


I also ordered all the steel, which is around 4,000 lbs. I only have a 16’ foot trailer, and if you haven’t ordered steel before, the material comes in 20’ joints, sometimes 24’. You can have the yard cut all of your pieces for you but they charge a pretty penny for each cut. So I went ahead and had them make one cut on each length to knock down the size so that it fit on the trailer. I then made the rest of the cuts in my shop.

This task was made easier by a few things:
1) Matt’s plans provide a cultist for each part through the entire build and I first tabbed the plans so that I could quickly move to each page showing a cut list.
2) The Wilker Do’s chop saw station plans I just built. Before this build I was using the floor to cut long joints. Having this station to work off of and have my material fully supportive by its long wings was definitely a game changer.

Then 3) the Diablo Cerment blade. This blade is incredible. It’s brand new technology from Diablo that mixes ceramic and metallic in the teeth. It not only produces little to no sparks when cutting metal, but also makes such little heat when doing so that the steel is actually cool to the touch after making a cut.

This blade also creates a burr free finish which means less time dedicated to clean up work. Not only do these blades last 10 times longer than carbide tipped blades, they also come in at a lower price point than carbide and diamond tipped blades. If you want to look into these cerment blades I have a link for you below but note they do require a slow speed saw, something that operates around 1600 rpms instead of a traditional chop saw that operates around 6,000.

After a part was cut to length, I would label it in a yellow paint pen before sitting it aside. This way we could go over to the pile and quickly grab what was needed.

After all the joint material was cut I next moved to drilling and tapping all the holes. There is about 2 1/2 days worth of drilling and tapping here. It isn’t hard but it’s slow going because everything is so heavy and takes a second to move around.

I recently built a new drill press stand for my woodworking shop. However for this build, the joints of material were so long I ended up using my Triton Superjaws as side supports. I also used a plywood box that was built based of the SuperJaws height which worked really well.

When it came time to tapping the holes, I ended up using a drill to get through it faster instead of manually tapping holes. I’ve always known that you can drill and tap a hole but there is a difference between understanding the concept of something and actually doing it. I found tapping metal to be fascinating. For those of you who aren’t familiar tapping means you cut threads into the hole you drilled. Meaning you can put a bolt anywhere without having to get to the backside and secure it with a nut.

I asked my shop helper Scott to tap the majority of the holes while I moved onto other things, because there was still lots to do before the the guys arrived.
Since I have a plasma CNC, I decided to model all of the flat parts needed for the build and use the CNC to cut them out. I again worked off Matt’s plans to put this cut list together. Three different thicknesses of steel are needed for the parts so this material was picked up at the same time as the joint material. Since my Plasma bed is a 4’ x 4’ that’s what I had the yard cut the sheets to.
Now, getting the very heavy sheets up to the Plasma CNC table was a task all in it’s own. As you can see the tractor, a few straps, and Bessey clamps were called in here. BTW: I have no affiliation but these straps, in the green and the purple length were a huuuuge asset. They have definitely earned a permanent spot in my shop.

But going back to the plasma CNC, I ended up having issues with the compressor running my table and therefore not being able to utilize it. And unfortunately since I thought this would be one of the quicker tasks, I saved it for last. This meant the guys showed up and I didn’t have any of the flat parts cut out. Of course everything can be cut out with a grinder but since we only alotted five days to the build, that would eat up way too much time. Thankfully, somebody in a near by town was kind enough to open up his shop and cut the parts needed. Special thank you to him especially considering it was on Super Bowl Sunday.
Alright, I think that about catches you up on what we’re building and what was done up to this point. The last thing I had time to do was stage the parts needed for the first stage of the build, which is the enormous bed.

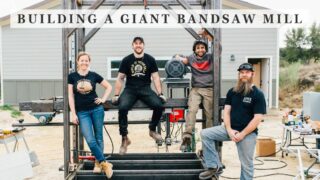
Now let me introduce you to the build team so you know who is who.


First up is Johnny Brooke who runs the channel Crafted Workshop. He is based in North Carolina and is an all round Maker tackling projects of wood and metal and producing videos on how he does it.

Next up is the master welder and fabricator of our group, JD. JD does welding and fabrication for a living and I’ll tell you now that without him on the team, we wouldn’t have been able to get as far as we did. He is based out of Atlanta and can be found on Instagram under the handle Apexish.

Then last but not least, is the designer of the mill himself Matt Cremona. Matt is actually a fine woodworker but he learned how to weld and build a mill so he could slab his own material. He is out of the Minnesota area and also runs his own youtube channel.

We were missing Johnny at the start of things because he had a later flight than the others. We went ahead and got started, due to the short time frame of things.
Now with all of the parts of the bed already cut to length and drilled and tapped, we kicked things off by prepping the areas where we would be joining things together and welding. The steel comes out of the yard pretty dirty, with mill scale all over it, and sometime rust. To get the best weld, the area should be cleaned off with a flap disk. You’ll see throughout this build we hopped back and forth between a battery operated grinder and a corded one, depending on the task.

The feet for the bed are made up from nut and bolts. These will give the mill adjustable feet so that when the mill is moved outside (because yes, the mill will be built inside but moved out in pieces later) we’ll have a way to level up the bed to the uneven ground. The nut will be welded to the rails, centered over a hole. We used the bolt to keep the nut centered in this hole, while we came through and tacked and then welded them in place.


While I worked down one side, JD started on the other with Matt watching. Matt stick welded his entire bandsaw mill and had never mig welded before. After watching JD through a hood, he got to try his hand at Mig for the first time. Needlessly to say, he loved it and took over the other rail while JD set up a third machine and started down the center.

That was another big area of prep that I did before the guys came in….Setting up gear and workstations to accommodate not only a project of this scale but also multiple bodies working in the shop at the same time. For this project we are using the Lincoln Electric Power Mig 210 machine and also the Power Mig 260 Machine.


After getting the feet in place, we started joining the frame of the bed together. For this step, and quite a few other steps actually, we used the help of these awesome squares that I had never heard of called Fireball Squares. Thanks so much to JD for bringing them. They are machined perfectly square and come with tabs on them so that you can clamp them flush to your workpiece while also joining things at a perfect 90.


After getting one positioned in each corner, we moved onto the very time intensive, but important step, of squaring up the frame and making sure it was flat.
And something I love about working with others is seeing other people’s workflow and how it differs from yours. When it came time to measure for square, Matt and I were pulling out our tapes but JD went to his bag of tricks and pulled out a laser tape measure. I never would have thought to use one, but apparently it’s a go to tool in JD’s shop and after this build I can see why. We used it to take the diagonals of the frame and knocked it here and there until it read square.

Next thing was to make sure it was flat. It is very important that the bed is not only square, but also completely flat. To measure this we strung out some string in a tight X formation and moved the corner feet up and down until the strings were just kissing each other.

I think in real time that step alone took us about 1.5 hours to do. But it’s worth it because of how important it is.
Next JD tacked then welded the frame covers together while Matt and I started setting up the bed’s cross members. To make this a little bit easier, we grabbed a bunch of scrap pieces of metal and clamped it to the ends to create a lip for our joints. This is so we could ensure they were sitting flush with the top of the long rails.


It’s funny because before this project I truly thought I might have too many clamps… and I was wrong! I put every single one to use and there were times where I went hunting for more. Assembling this bed is a great case in point.

Before actually welding these joints in place, we worked down the line with JD throwing a level on each one to make sure they were sitting in there plumb. Then I threw in a few tacks when he said they were good to go. You can see Matt in the background getting things ready for the next step of the build. After my tacking duties were done I went and joined him while JD did all the finish welding.

Dividing up tasks and having multiple things moving forward at the same time was a key component to cramming this project into such few days. And even though I did a lot of prep work, there were still a lot that I didn’t get to and we had to do as we went. So while JD welded, we stayed out of his way but kept ourselves busy with making another component. Although we didn’t hesitate to stop and take part or watch when something cool was going on. Like when JD needed access to the underside of the bed to complete the welds and I used my new-to-me (old) shop crane. This wasn’t something I purchased for this build (the timing is purely coincidental) but man alive am I glad it was around because there are a lot of heavy things in this build and it certainly came in handy.


Continuing on with the bed parts, next JD and Matt worked together to weld on what will be some supports, or stops. The height of these are adjustable, and will prevent the log from rolling off the bed.

Then the last step on the bed was to grind down the top welds so that a piece of angle iron could be added to the top and attached. This went really quick as the holes for the rail and the holes in the angle iron were part of the “done beforehand” pile. This meant we just had to go through and bolt it on.

Now the bed actually needs additional steel on top of the cross members that will protect them from getting beaten up but also will raise them to the same height as the angle iron. However, the steel yard that I ordered my steel from, left them off my load. Not a huge problem but it is something missing that we will need to add later.
Other than those missing top pieces, the bed was complete! And I will say we were impressed and happy with ourselves for knocking it out so quickly. We actually got the entire bed done before Johnny arrived. So while he’s missing from this episode he was a vital part in the build and will be in the following parts to come so stay tuned.
I think that’s a great stopping point for this week. In the next video, we will continue the build with building out the carriage. I’m so excited about sharing this project. I hope you are enjoying it so far. See you on the next one.
Matt Cremona’s Bandsaw Mill Plans
Watch Matt’s Video Building His Mill
(Most of the product links listed above are affiliate links. As an Amazon Associate I earn from qualifying purchases.)


