How to Build A Bar In A Box in 14 Easy Steps!
- Random DIY Projects
- 001513bah
- Updated: April 20, 2024
In this video, I’m going to show you how to build a bar in a box. Not only is it great for entertaining, it’s great for small spaces. It can be easily compact when not needed but open up when you’re entertaining. Let me show you have to build it.

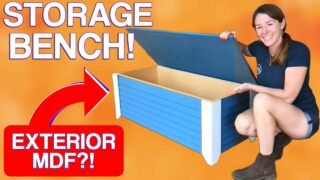
I’m going to start off by building the main body. I’m using DAP weldwood wood glue on every joint then a brad nailer to pin things together. For material, I’m using an exterior grade MDF called Armorite. Armortie is a dream to cut on the CNC so it’s my first choice for projects I’ll be painting.
Next I could lay the box I’m making over, overhanging the bottom so the unit lays flat on the workbench. Then I crawled inside and laid down a bead of glue all along the edge. This is so I could pin on some trim. This might seem confusing for a moment but you’ll see how it all comes together shortly.
For right now I only placed four pieces of trim on, and left a gap in the center. This is so I could flip the entire thing over, again moving the unit to the edge so it lays flat, then applied more glue to the inside of the overhanging trim boards. These trim boards will catch a panel that will eventually become the front of the unit. Mine was a little tight but it was nothing a little stomping couldn’t fix. To hold it in place while the glue set up, I used a few pin nails all along the perimeter.
I wish I would have stood it up at this point to show you what I was doing, but I didn’t. So let me skip ahead and give you a visual on where I’m going with all of this. Once placed on it’s bottom, it will not only be able to be rolled around, but the panel and trim will create a front, then what I do next with a divider will create a sectioned off inside.

Now that you see where I’m going, lets go back to adding in the divider. This will create two inside cubbies so I placed it right in the center. To avoid measuring, I actually grabbed the shelves that I already cut to length and used two to act as spacers, setting one at the base and one at the top to make sure the divider was going in parallel. To pin it in place, I used my speed square to project down in the line of the edge. Unlike typical MDF, Armorite doesn’t mushroom out or flake off when using a nailer.

With that in, I moved to the side of the unit to start building a box. This will be the bottom platform that will house the casters. I again used wood glue and brad nails to join things together. BTW: I have a set of plans that have a cut list and material list if you want to build your own.
This box, I clamped to the bottom side of the unit so that I could climb back on top of my workbench to secure it from the top side.
As far as mobility goes, I don’t expect to move this thing a lot so I only put on two fixed casters. However, another option is to put on four swiveling casters that will give you more mobility. I placed my two fixed casters on one side then what I’ll call a foot on the other. This foot is just long enough so that when the unit is sitting flat, the casters don’t touch the ground. This will ensure the bar can’t roll around until I tilt it slightly up on one end and intentional wheel it where I want to go. While giggling of course.

Ok with the bar in a box body upright, now I can finish out the front trim. This is as simple as cutting the pieces to length then gluing and nailing them in place. I carried the bottom right trim piece to my house and forgot it, so just image that in place as well.
Now lets go to the inside of the unit and add in some shelves. Keep in mind you could add as many or as few as you wanted but I personally only wanted one shelf per side. My plan for keeping things from falling over is to run small metal tubing across the front. I made all my location marks using a square then counterbored with a drill bit just slightly larger than the tubing. On the center divider, I made a through hole. This way, once done, I could feed the tubing in from the left, go through the center, and go into the right wall.
I’ll glue these in later but for now, I left them dry and moved on to making the doors. Which is a really similar process to making the bar in a box body.


I started by building a box using wood glue and brad nails. Then I lined the edge with a bead of more wood glue to add on trim. Again, this trim will eventually be the show face you see. So right now I’m building it upside down. But by doing it this way, I’m able to flip it over and easily insert the front panel so that it’s captured to this trim and flush to the front. You just have to make sure it’s seated down all the way when you’re securing it.

Next I did the same process that I did to the body by adding in shelves where I wanted them, if you use my plans you can certainly use my dimensions which fit standard bottles, or you can adjust them to store the items you’re looking to shelve. After adding in the cabling, I added on an adjustable foot.
So when the wings fold out, this foot will be able to drop down to the ground and lock into place. To do this, I started by drilling two through holes for carriage bolts. Once put through the foot’s slots, I added a wing nut to the inside to give me a locking feature. The great thing about this is even if the bar is on slightly uneven ground, it won’t matter because each wing will be able to drop it’s foot down independently of the other.
While I had the door on my workbench, I DAPed and caulked everything. I’m using Platumn Patch by Dap to fill in any of the nail holes or seams that will show on the face. Then for the caulk I used Alex’s Fast Dry.
After doing it once, I repeated it all again to build a second. Making sure they were mirrored to each other and not identical!


Things are looking right, so lets hang them on the body! I used a small spacer to rest on the platform of the body to set the door on and create the clearance needed. I tried to drop the foot down to hold it’s position. Didn’t work, so I instead hooked my foot on the underside and just made sure to have my drill ready. I like to pre drill for the smaller screws that come with the hinges but it’s really as simple as pre drilling then attaching with screws.
After repeating on the other side, I’ll now show you what I got. I’ll stand on the other side of the bar to not obstruct your view, but the idea is I could have a consolidated footprint when not in use, but then easily flip out a door, drop the foot. Then flip out the other wing, and drop the foot….when I do want to use it. Cool.

Now let me work on a top. I went with two layers of the same material that this entire unit is made from which is an exterior rated MDF called Armorite. You can get 1” thick Armorite but 1/2” is way easier and cheaper to get a hold of so I cut then glued two pieces together to create the 1” thickness.
Since I discovered Armorite last year, you’ve been seeing use it more and more for projects where regular MDF simply wouldn’t be an option. To have an exterior rated MDF truly is a game changer. Even when getting wet, it does not swell and fall a part, it’s incredible to machine coming right off being cut nice and smooth, and it has Zinc borate in it to resist termites and other insets. I’ll leave you a link to locate Armorite near you.

To accommodate the body expanding by the doors folding out, I also need the top to somehow expand out. That’s where these cool little hinges come in, they are called flap hinges. They are kinda tricky to drill for because they are only a portion of a circle so you can’t use an entire forester bit like you can on regular cabinet hinges. However, a simple fence at the drill press solves this issue.
I set the fence so that most of the bit was going into the material but the rest was going into the fence. Then I would use the hinge itself to gauge the depth. Once I repeated this on two sections, I could screw the hinges in place and test it out.
Ok so the idea Is to place the two sections at the center, right on top so that when they are folded in, it’s nice and compact. But then I can flip them out to expand. After positioning the top sections squarely, I pre drilled then secured with screws. I didn’t like how the doors could be set at any angles, so I added in a stop block to dictate the exact position. Nice and simple.

I actually have an entire video outlining the proper way to paint MDF so I’ll link to that video for you. For the top I chose a black laminate which can be a little tedious to apply but is actually quite simple. First thing to know is you want to band the edges first. I cut a big sheet into small strips that are slightly oversized.
To apply it, you use something called contact cement. It’s traditionally sold in a can that you can brush on but Dap has actually come out with a spray form that I love. I use cardboard as a backer to catch the overspray.
When using contact cement you need to apply it to both surfaces that will be adhered together. You can see I use an assortment of trash to collect the overspray. Then unlike wood glue, you actually let the surfaces dry until the cement is tacky, this is anywhere from 3-10 mins depending on climate, then you push them together. A roller is a great tool to have around to apply pressure but you can use anything that won’t scuff the surface.

After getting all the edges banded, then you repeat on the faces. I actually wanted the two center pieces to be seamless so after biscuit joining them together and screwing them down to the body of the unit, I repeated by spraying both the MDF and the laminate, making sure to get the edges really well coated.
The reason you want to leave the piece oversized is because it’s way easier to use a flush trim bit and router to make it perfectly flush after the fact, than trying to align two pieces perfectly fit for each other. Again apply pressure with anything that won’t scuff the surface. Haha.
One last thing to note, once the surfaces are in contact with each other, they don’t come a part easily. Again, it isn’t like wood glue where you can slip it around after the fact. So make sure you like it before you stick it.

Last thing I needed to do was drill for the hinges. To prevent the forester bit from walking around on you when you start drilling, you first want to predrill with a small drill bit. Then to prevent the edge and the face of the laminate from tearing out, I clamped a board in place. I used my glue cauls on the edge and a jig with a through hole for the bit on the top. Once the tip of the forester bit found my pre drill, I clamped the jig in place and drilled down until the depth was correct for the hinge to be flush. Once you break through the laminate, you can remove the jig.

Next, the second pair of wings can be attached and I’ll call this project done!
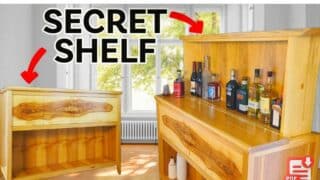
I ended up adding a handle to the side to help tilt it up and move it. This is what it looks like when it’s compact and stowed away, but then to use it I just have to fold out the door and drop the foot. Fold out this door, and drop it’s foot. Fold out one top, and two top, and the bar is officially open. For you to see it from the bartenders side, I put two barrel bolts on the doors to keep them shut. On the inside there is plenty of storage space for bottles or shakers or glasses.
Actually, glasses are probably a bad idea if your unit will actually be moved a lot but I see keeping mine full during the nice seasons then I’ll empty it and stow it away during the really cold season.


