How To Add 220 Volt Outlets To The Garage
- Electrical DIY Projects
- April Wilkerson
- Updated: March 5, 2023
Thinking about adding in some 220 volt outlets? Check out this DIY project where I show you how I added some outlets in my garage!
I know plenty of you can relate to the struggle of not having any 220 volt A/C outlets in your garage space. Same here. The new place we just moved to has only one 220v outlet and it is dedicated to the water heater. This week I am adding in 2 outlets (or “plugs”) to the garage.
Some quick lawyer language: I am not a professional, I do not claim to be a professional, and I am not encouraging anyone to do any work that is not legal, permitted, inspected, or unsafe. If you do not feel confident or qualified to do electrical work, I strongly encourage you to hire a professional. If you recreate any of the work shown here, you are operating solely at your own risk.
Bluetooth Hearing Protection
Drills
LB Connection
Bandsaw
Spindle Sander
SO Cord
PVC Conduit
Conduit Straps
Junction Box
3/4″ Male Adapters
Lock Nuts
Gang Box
Fish Tape
THHN
30 Amp Breaker
Fluke Meter
Here’s the plan: Add 2 outlets to the garage; start by running all of the conduit for the wires, mount the plug boxes, pull wire through all the conduit, terminate all of the wires inside the plug boxes, route the wire inside the panel, then finally wire in my breaker.
Here’s what I’m starting with: I have a large 200 amp service panel inside my garage. This is where the main line comes into the house from the pole.
This panel only contains 220v breakers which supply things like the air conditioner circuit, the water heater, the furnace, and another 110v sub-panel inside the house. Fortunately there are multiple vacancies inside the garage panel for more 220V breakers which I intend to use for this job.
Getting started: I plan to use these two outlets for my table saw and the plasma cutter or welder. Between the two of those tools, the MAXIMUM current draw would be about 21 amps. This number determines the size of wire, conduit, and breaker I will be using. According to the NEC, a 30 amp 2 pole breaker and 10 awg THHN wire will do the trick while giving me some room in the circuit (and the conduit) to run a bigger load if I need to. Lastly, all of the wire will be inside ¾” conduit mounted directly to the dry wall.
The work: First things first – KILL THE POWER! Our place has a large main disconnect at the pole so it got turned off first. Once the power was off, I started cutting in an access hole in the drywall at the top of the breaker. This is where the wires will feed in. I cut the access hole so I can easily make a removable board to put in its place in case I ever need back in the top of the panel.

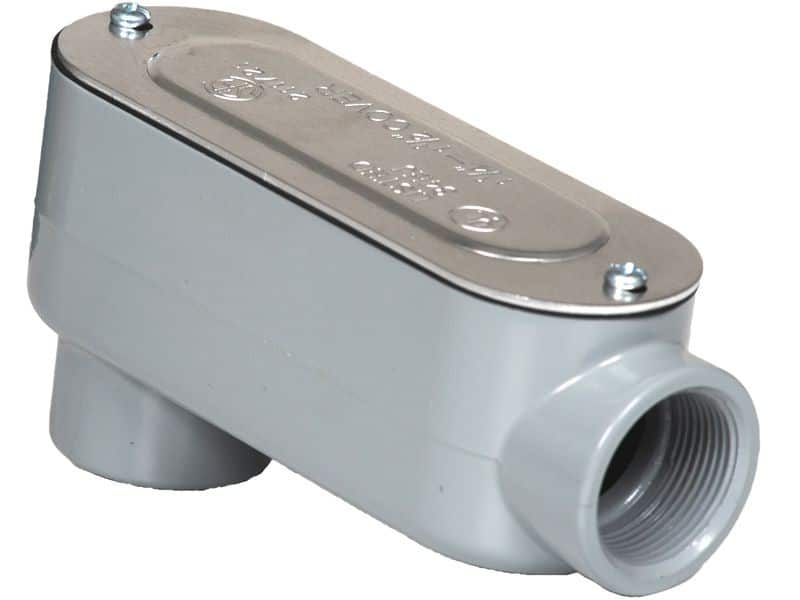
I then started running the conduit. This part is pretty self explanatory – as long as you know where you are ultimately going, it’s just a matter of piecing together sweep 90’s and straights until you get to the outlet location. The first piece on the wall is called a ¾” LB. As you can see, unlike the sweep 90, this fitting allows me to come out of the wall then keep the conduit tucked nice and tight to the wall.


From there I pieced together some straights and 90’s until I got to the other side of the garage where I mounted the junction box and first outlet. At the junction box, I broke out of one side of the box and ran my conduit over to where the next outlet is mounted. All of the conduit is held to the drywall using one whole conduit straps and drywall anchors. Note: I like to use a level while running the conduit to make the job look nice and clean.

It’s important to note that I did not use PVC glue when putting these pieces of conduit together. Since this is an indoor job, I do not need a watertight seal that the PVC glue would provide. Additionally, in case I ever want to remove this conduit, it will be much easier without being glued together.


Time to pull some wire! I used a fish tape to pull the wire from the electrical panel to the first outlet box. I was sure to pull a little bit extra out of the outlet box so that I could make wire terminations on the back of the outlet as well as inside of the junction box.

The fish tape is connected to the bundle of wire using a small lasso as you see up above. Typically you would tape the wire up with electrical tape, but since I did not have any, duct tape will do. Once I was happy with it, I cut the wire to length. Lastly, I pulled a short leg of wire from the junction box to the second outlet box. Same story here, I left myself plenty of slack to make the wire connections.

Now that all of the wire is pulled, I can start making all of the connections at each of the ends. I started with the farthest plug outlet keeping track of which wire terminates to which side of the plug so that everything is uniform throughout the circuit.


Same story for the junction box – all the colors were matched to one another then wire nutted together using the appropriate size wire nut making sure the wire nuts were nice and tight…….not just snug, but TIGHT.

Finally, I made the connections at the electrical panel. I am using a 2 pole 30 amp breaker made by “Square D”. I had to remove a knock out at the top of the box to access the inside of the panel with my wiring. Once it was removed, I neatly routed the wire through the conduit, around the box with plenty of slack in the routing, then terminated two wires into the back of the breaker and the ground wire to the ground block of the panel. To get from the LB to the top of the panel, I used a short section of “seal tight” conduit and a seal tight 90. Code specifies that conductors of this type get placed in conduit all the way to the box.

Before installing the breaker into the breaker box, I used an electrical meter to measure the continuity between each one of the legs of my circuit (1 leg of ground, and 2 legs of 120v). This is simply a safety check to ensure that there are not any shorts in the circuit. After everything checked out just as it should, I mounted the breaker in the breaker box.
And for the grand finale, I got to energize the circuit! I left the breaker in the “off” position when energizing the panel from the pole. I did this so that I could flip the breaker “on” and energize my new circuit while standing in the garage, and not far away from the house where the main disconnect is located. After turning on the breaker to my new circuit, I measured the voltage at the outlets and sure enough……240 VAC between the two hot legs and 120 VAC between each hot leg and ground. Success!

And that pretty well does it folks. To wrap up all these sparky bits, I installed my new access cover then reinstalled the panel cover and called it good. Finally, I can plug in my table saw and start making some saw dust : )
Thanks for stopping by and learning more about the process. If you take on a similar type of job at your own place, please be careful, work smart, and do not take any chances with your work and/or the safety of others. Always have your work inspected by a qualified electrician to ensure everything is installed according to your local building/NEC guideline. And just for clarity sake……if you use any of this information for the purpose of your own work you are strictly operating at your OWN RISK. Thanks again.
Take care – April