

DIY Glider Bench | How To Build Your Own | 12 Easy Steps!
- Furniture DIY Projects, Outdoor DIY Projects
- April Wilkerson
- Updated: March 4, 2023
Thinking about building your own DIY Glider Bench? Check out this project where I take you through my build step-by-step! + DIY plans to help you!
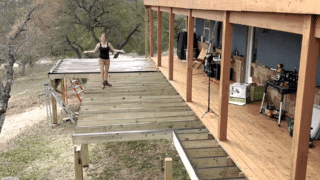
It is finally spring time and that means it is perfect weather for some front porch sittin’! This week, I made myself an outdoor glider bench so I have a smooth and comfortable seating option on these beautiful mornings and evenings.
The first thing I did was take my wood materials to my table saw to cut out pieces. I put together a cut list before getting started on this project so I was able to cut everything at one time. I did all my straight pieces first and then move to the curved pieces. For this I used a set of templates that I put on top of my board then trace.

Form there I took the part to the band saw and cut it out. I used my Triton Oscillating Belt Sander to round out the ends. You can also use a flush trim bit at the router table to get the same shape. I took all my parts to my router table. Using a router bit I soften out all the edges. This is a subtle detail but it really makes a difference in the end.

I started by grabbing the footer and two vertical upright parts and attached them together. I’m using a spoil board under my piece so that I can drill directly through my two pieces without drilling into my bench. It also prevents tear out on the back side.
After drilling the first hole I placed a carriage bolt to keep the holes aligned. I also used a speed squarer to square up the two components. I repeated the same process when attaching the back parts to the seat parts. Each set requires two bolts and while you can drill both in the same time its best practice to drill a hole then place a bolt, then drill the second hole and place the second bolt. This keeps things from becoming misaligned.

I’m using galvanized everything to prevent any of the nuts and bolts from rusting out since this will be used outside. However I couldn’t find galvanized lock nuts. I like these because they have a layer inside to keep the nut from backing out over time. With this project being in motion you definitely want something to lock. To make sure the pieces don’t back out over time, I’m using a thread locker made by DAPP. Use a bit of gel on the thread of the bolt before tightening down to keep it from moving.

I can join these parts together to make up the bones of the glider bench. I spaced the bench back assembly out evenly across the footer and started attaching. I attached each one it’s two exterior grade screws checking with a speed squarer as I went along to make sure things were nice and square before attaching.
I also pre-drilled here as I’m going into the end grate. Pre-drilling helps prevent the wood from splitting.

Next was to attach the slats. To make sure the front was square as I was building, I started with the back most slat. I used a measuring tape to make sure the parts spaced the same amount as they were in the front. I then worked my way to the front, not having to worry about squareness because everything is already locked into place.
To make attaching these slats quick I’m using two spacer and a Brad Nailer instead of screws. Screws work great, they are just more time consuming. If you go with them then be sure to predrill to prevent splitting the back piece. If you go with nails then just be sure to use galvanized nails. If you don’t, the nails will rust out very quickly.


Something to pay attention to here is getting the arms attached level to the body. First, I throw in two screws to attach the front of the arms to the vertical upright piece. Now I can place a level on the arm to see the angle it will need to be attached to on the back. That completes the top portion of the glider bench!

After cutting my pieces to their needed length, I rounded over the bottom edge of each leg. I traced a curve from something round, in this case a roll of duct tape, then cut it out over at the band saw. I cleaned up the cut wit my Triton Oscillating Belt Sander. To attach it, I first applied some outdoor wood glue to the front side, then clamped it in place. Here, you’ll see me use a level to make sure the piece was plumb before attaching it with screws.
I repeated this with the back leg. However this isn’t plumb so I made sure the angle on the top was seated flush with the underside of the arm. After having one side complete, I sit the glider bench across my armor table so that I can access the other side and repeat the process. These four legs are what will span down to the base so that it glides.

Next, I got to building the frame work that will attach to the legs. I started with the bottom of the base. Since this will be in contact with the ground, I drew a cutout portion to create two feet for it. I used the bandsaw to cut it out, then headed over to my Triton Spindle Sander to clean up the corners.
The oscillating sander can be turned into a spindle sander, however I keep them separate so each is dedicated to their own task.

The assembly for the base will be very simple. It’s just four parts, essentially making a box. There are plenty of ways to join these parts together to make them strong and supportive, but I’m going to be using a Mortise and Tenon method called “bead lock” from Rockler.
When I laid out my parts, I used a speed square to draw a line from one part to the next. This way I can take one part at a time and clamp it in my Trition Superjaws. This device will hold down the piece so that I can line up it’s centerline to my pencil line. Once I clamped it down I’m ready to drill in the three holes at the top using the guides.
After that’s done I can unlock two knobs on the front and slide the guide over to position b. This halfway closes one of the holes and allows me to drill in the far left two. After I remove it from the jig you can see I’m left with the receiving mortise.
Once I repeated the process on all my remaining parts, I was able to apply wood glue into the mortise and hammer in a Rockler provided Tenon. Now, the parts will fit together like a puzzle piece.


Rockler makes the jig I used that attaches to your wood and allows you to drill in a series of holes. They also make a tenon that fits into these holes and gives you the connection between two parts.
Finishing off some details for the glider bench base, I rounded over the edges to soften the look then I marked off the location of a kneaded front stretcher. For strength I decided to dado this in. I marked the location off with the speed square then used a straight bit in my router to cut it in. I have marked this location in the plans in case you want to build your own.
I used more wood glue to attach this stretcher. Using a brad nail on each side to pin the stretcher in place so that I can have both hands free to pre-drill and drive in a few screws to attach it. With that in place I flipped the unit on it’s back to make attaching the back stretcher a little easier. After applying the glue I again used a few screws. Next I drilled in holes for the glider hardware.

My mom decided to drop off some lunch and helped me out with the last few steps of assembling the glider bench. Hi Mom!
The hardware used to turn this into a glider is specific glider hardware that can be found at Rockler. You drill four holes then attach with a bolt. I again used dap’s thread locker then a ratchet wrench to tighten down on the nut and washer. Now we get to join the glider bench base and the seat assembly together.

I set the base on the floor of my shop, then slowly lowered the glider bench base on top. In order for the bench hardware to work, all four bolts need to be attached into the corresponding holes in the legs. After pushing the bolts into the holes, I secured them with a nut and washer. Voila! We’ve finished our outdoor bench that glides! I put a stain over mine, but this is optional. Feel free to personalize it however you’d like!


If you haven’t already, don’t forget to sign up at the top of this page for my newsletter so you don’t miss new projects!
(Most of the links listed above are affiliate links. As an Amazon Associate I earn from qualifying purchases. Thank you for supporting me in this way.)


