How To Build A Covered Porch | With Greg Pennington
- Outdoor DIY Projects
- April Wilkerson
- Updated: February 26, 2023
Thinking about building your own covered porch? Check out this DIY project where I show you how I built this DIY covered porch!
If you missed my last video where my friend Greg and I demoed his existing porch and deck, then rebuilt the deck, then you can find that video HERE. In this video we’re continuing the process by rebuilding the porch. Ok here we go!
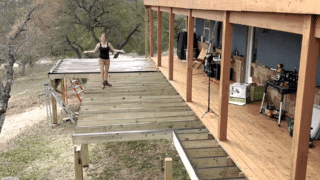
When we were demoing the old porch, the only part we held onto to reuse were these giant white oak posts. Actually, Greg is also a Sawyer and actually milled these posts himself.

We detached them from the rubble then set them in place one by one. Making sure to place these on top of the beams of the deck so the they were on solid footing, then we set two braces in place to get it nice and plumb.

To start, we would first make sure the post was sitting square to the face of the deck, then using a post level (which reads level on two faces at once) to move the post into plumb.

While one person was reading the levels, the other person would be squeezing down on the clamps to hold it in position. After checking it one last time that nothing had moved, we threw a few screws in the braces. If you don’t have a post level then using a 4’ level on two sides also works.

After we got the second post set, we next moved to the top and set the header to hold them into position. We could have gone through and first set all the posts, then gone back to do the headers but instead we built the porch by working left to right, and going through all the stages before we moved all the ladders and scaffolding over.

Once the header was in place, then we started throwing up the rafters.
Well not right away, we first needed to figure out the the angle and depth of the back cut to allow the rafter to sit on the header attached to the shop, then also the front birds mouth cut to allow it to sit on the header spanning the posts. We started off with positioning one rafter in place to get both of these figured out and marked, then we cut it and test fitted it to make sure it worked.

Once it was good to go, we marked this one as our template and used it to duplicate the cuts on all the other needed rafters….which was a lot.
Greg and I ended up finding a really good system for cutting these out quickly though. He would grab a new board from the raw material stack and set it on the tailgate (which is a wonderful job site workbench by the way).

He would then place the template on top of the new board and get things lined up then he would use the circular saw to cut the end to length, then also make the majority of the cuts for the birds mouth.

While he was doing that, I would make the finish cuts with a jigsaw to end up with clean 90 degree corners.

It’s easier to use a circular saw and just overcut the corners so that you don’t have to use two tools, but that messes with that weakens the connection so since this is something that will be around for a long time, just take the extra time to make it clean.
After switching sides and both our tools finishing their needed jobs, I would take the completed rafter and set it in place over at the porch while Greg grabbed the next board so we could repeat the entire process.

I always feel like processing material is a big slow down in the project but the great thing about getting things staged like this is it makes the next step fly. With the rafters all ready to go and lined up, Greg and I could position our ladders and very quickly start installing them.
Our system here was Greg passing over the tail of the rafter to me while he walked up his ladder. I would position it on the header and secure it in place. I don’t know if you can tell but I have a spacer here to avoid having to pull a tape to set each one. I would use the spacer to determine the location then once I pinned it, I would throw it move it out of the way, finish securing it then use my spacer on setting the next one.

Greg didn’t have a spacer at his end. Well he kind of did. See, the front of the porch gets blocking in between each rafter. This is a board cut to length to fit in between the rafters but it gets secured in place. This not only gives ridigty to the rafters to prevent them from being able to roll, but it also closes off the gap that’s created between the top of the header and the top of the rafter. Just to keep birds and such out.

One addition that made this step easier was Justin, who is the videographer, ended up passing the rafter up to Greg which saved him a trip up and down the ladder. With the third hand, we could actually attach two before we had to shift the entire operation down some.
Once we installed all the rafters we could on the two posts we had installed, we would both hop down then install the next post…..the next header….then repeat with the next set of rafters.

We completed the rest of the porch by working in bay sections like this. And this is probably my favorite part of the project, I love stages that you can really see drastic change and progression.

To give you an idea on timeline, the deck took us two days to complete, then so far all of this progression was a days work, so things really do move along quickly.

Then before calling this step complete we went to the two ends of the porch and attached an additional rafter to cap it off. These are in line with the house and will act as the subfasica.

Not too shabby huh? But it isn’t done yet, now we capped the front of the rafters with another 2×6. This board is called the Fascia.

We would first pull a tape and figure out what the board needs to be cut to, to land on the center of a rafter. Then face nail it directed into the ends of each rafter. Just a tip: Use a speed square or another straight edge reference to align this board. This will keep your roof in one line and avoid a bump that would be created if you flushed up the rafter by hand.

The next day we started off by tying all the rafters together with perlins. These are 1x boards that are spaced apart every 2’ and these not only tie the rafters together, like I said, but also gives boards in the center of the roof to screw into on the next step when we start attaching roof panels.

This is such an easy step, it’s literally just placing the 1x in place, making sure it falls on the center of a rafter, then nailing it down….but it takes forever! Because it’s a ton of crab crawling around which is surprising really tiring. I would work from one side of the roof to the other, then from the front of the porch uphill to the back. When I got to the sides I would let the perils run wild then after they were all installed, I used a circular saw to trim them all flush.

Next, bring in the roofing panels! Greg went with standard metal roofing panels and since he has a tractor he first placed them on the forks to lift them in the air for me to just grab then place into position.

After laying down a sheet, he would inch the tractor forward so that it would be in line with the next needed position so I could pull it directly off and on.

Since this was really just a one person job, I handled the high work while Greg tackled building a set of stairs for the deck.
After getting a sheet laid down with one corrugation overlapping the previous panel, I would secure it with screws. Going into each one of those perils that I set in the previous step. When you buy your roofing material it should come with screws in the same color. These will probably have a rubber washer under the screw head so that when you seat the screw in the metal, it will seal around the hole you’re creating and not leak.

I’ll tell you this….it’s a remarkable feeling to sit underneath shade you create with your own hands. I think it tickles something primal in our DNA that steams back to the instinct to create sheather…..ha, I don’t know, or I’m just odd….but it was outstanding to sit in our self created shade and eat lunch that day.
After taking a break, we got back to work though. As you build a structure like this, it’s fascinating to feel the progression as well as see it. It starts off flimsy then every step adds more and more rigidity to where at this stage trying to move/shake the structure feels 100 times better. Even though it felt strong, Greg’s old porch had these beautiful braces spanning between the posts and the headers so we quickly went to his shop and made a few more. Greg just free handed the design then we used a combination of a bandsaw and miter saw to make the shape happen.

: ) if you want to stay up to date with what I’m building in real time, be sure to follow me over on Instagram or Facebook.
Here’s a before shot:

And here’s the after!

That was all we were able to get done in the few days I was visiting but since leaving Greg has put a lot of the finishing details such as painting it, adding soffit, lights, and even some plants.

We celebrating wrapping up this big project by moving a table on the porch and having a family dinner on it and that was really the cherry on top of a great rewarding week.


If you have a porch on your list than I really hope that this helps you out! Be sure and watch the video above for even more details. Also, check out Greg at the links below. He offers tons of classes on chair making in this wonderful heaven of a shop of his.
Hope you’ve enjoyed this one and I’ll catch you on the next one!
Other projects with Greg:
Also! If you missed the update, I now have shirts for sale representing my Hill Country Wood Shed!
If you haven’t already, don’t forget to sign up at the top of this page for my newsletter so you don’t miss new projects!


