How To Rebuild A Deck | 2 Day Deck Rebuild
- Outdoor DIY Projects
- April Wilkerson
- Updated: February 26, 2023
Trying to figure out how to rebuild a deck? Check out this DIY project where I show you exactly how! Only took us about 2 days to demo and rebuild the whole deck!
Recently I went back to Seattle and visited my friend Anne of All Trades along with our friend Erik Curtis. While there, we decided to tackle renovating Anne’s deck as our project.
ISOtunes Bluetooth Hearing Protection
Reciprocating Saw
Demo Blade
Chalk Line
Bessey Clamps
Framing Nailer
Jigsaw
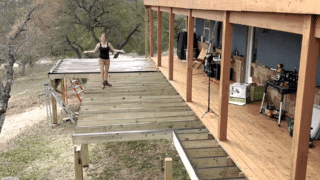
Let me give you guys a good look at the before photos here because I find it incredible to see just how much of a difference two days worth of work made to this entire area.


Anne was a little hesitant to tackle this project because she was thinking it would be more of a two week ordeal. Of course, there were three of us and none of us are slow steppers.
Alright lets get into the process.
The first step was demo of course. We grabbed a few pry bars and started pulling deck board up one by one.

Luckly as we got more of the substructure exposed, we were able to see that it was still in pretty good shape. Whoever installed the deck actually made a metal frame that keeps the joists up off the ground. With that looking good and not needing replacing or leveling, it shaved off not only a bunch of work for us but also time.
We worked out a system to be most efficient where I would stick to one side of the board and pry up the nails within reach, while Erik took the other side and pried those up. Anne would grab the boards we ripped up and toss them out away from the job site into a pile that could later be loaded up with her tractor and disposed of.

After all the deck boards were ripped up we started de-nailing the joists. Instead of spending a bunch of time with a hammer trying to rip them out, we just went through with a few sawzalls and a demo blade to cut them off flush and this goes so much quicker than the alternative.

With all of the joists cleared, next was to unload the new material that we will be laying down. Anne went with treated 5/4” boards (in the south our treated lumber is green but in the north it’s this cedar-ish color, which is much nicer looking).

The goal was to have a board running continuously from the house, out to the edge of the deck which meant two different lengths of boards (since there is a bump out portion where the pizza oven is, and then it narrows down some).
When offloading, I’m a huge fan of never putting material on the ground when possible, but rather propping them up on sawhorses. All this material will need to be picked up again, and it’s much easier to pick up a stack of boards if they are already at wast height than off the ground. Just throwing that tip out there if you tackle a large job. We also separated our the different lengths of material to make for easy grabbing once we were rocking and rolling on throwing boards down.
Before getting into decking through, we needed to raise the level up of this bump out. Especially with Anne’s pizza oven here, she found the step down to be very inconvenient. To raise it up, Erik first set a string line (which has a line level on it) on both ends to mark the height of the existing joists.

This way we could cut to length some 2x8s and sister them onto the existing joists but at a raised up level.

We started with the furthest joist and while Erik raised it up, I would read the line level. Once it was level, Anne would set a strong holding Bessey clamp to hold it in location while we moved to the other end of the board and repeated the process.

Next we repeated that same process on the nearest joist that needed to be raised up.

Once things were set, we could go through with a nailer and attach it.

With these two boards done, Erik laid a straight board across the two and we set the remaining boards by just butting them up to underside of this board.

That’s it for that portion of the build, now was to start decking it!
We started at the existing porch and worked our way out. Since these boards will shrink some, we didn’t leave any gaps between boards but instead butted them up right next to the previous laid board.
When we got to the pizza over post, we would just scribe a line and cut around them so they could slip in but look pretty seamless.

It’s worth noting we are using ringshank nails. If you aren’t familiar, ringshank nails have a ribbing design on them to prevent the nail from being able to back out over time as regular nails will do as the boards expand and contract. These are more expensive but using a nailer over screws speeds up the time on this project drastically.

The nailing is really just a two person job so while Erik and I got into a good routine with laying the boards and passing the nailer, Anne was keeping busy on hammering in any nails that the nailer didn’t quite seat, picking up trash, grabbing boards, and setting the spacer in between the house and the newest board.


The end of the board that’s opposite of the house doesn’t matter because that line can be cut straight after all the boards are laid down. However, getting a straight line cut up next to the house wouldn’t be as easy so this is the line we made sure lined up nice and straight from the get go. We did this by placing the same spacer in between the siding and the board before nailing it down.
By this point, it was getting late in the day (I can’t believe how long the sun stays up in Seattle….well, when it’s out). We decided to do the demo work of the next portion of the build.
See, the deck goes into a small section that runs perpendicular to the rest of the deck but Anne wanted this changed to run continuously into her shop which is that doorway you see there. So before calling it a night and grabbing an adult beverage, Erik and I demoed.

This part wasn’t as simple as prying up because it was set with screws, but most of them were so embedded in the boards, we couldn’t access them. So bring back out the demo blade in the Sawzall to speed this process along.
Man, that isn’t bad for a days worth of work huh? : )

On to Day 2.
Anne decided she would rather have a step into her shop rather than a ramp. So Erik started ripping the remains of that out, while I started cutting around obstacles to place the new deck joists. You can see this area doesn’t have any since the boards were running the other direction.

Erik was careful when demoing because he had the clever idea to reuse the good boards rather than purchasing new ones. We sistered this joists into the existing joists from the deck.

For the new step up, we placed a header with some concrete screws into Anne’s shop doorway, then set some 4×4 posts.


We are actually setting the outside floor joists to the posts at the same time. We first attached one side to the header located under the doorway, then placed a level on top to get it nice and straight before attaching it to the post. We are also making sure the post itself is plumb in two directions before attaching the screws.


Once that is set, the posts can be cut to final height which is flush to the top of the 2x6s.

BTW: while Erik and I were tackling this step, Anne was building out a firewood storage rack on her awesome outdoor pizza oven so we could enjoy home made pizza after all our hardwork. She not only made a shelf but also chopped up a bunch of wood.


Back on the step, we added in a center joist to give more support then started laying down decking once again.


Now for the last finishing touches.
As I mentioned earlier, we lined up the deck boards on the house side but let the free end run wild, so now we needed to snap a chalk line then rip all these boards to be the same exact length. While Erik and I tackled this, Anne went through and dropped a second nail into each board.


We were worried that we would run out of nails so when we were laying down the boards, we only put in one per joist. Then we could clean up the jobsite, put back all the tools, and give her a good ole sweeping.

Whhhhew, what a big difference it is! I love tackling projects where there is such a drastic before and after appearance annnnnd if I’m being honest I love knocking out so much work in a little time frame. : )


Now, Anne not only has a much better looking porch but also a better functioning one as it’s all on one level. She also doesn’t have a trip/fall hazard coming out of her shop, or trying to get into it.
We celebrating by inviting a few awesome Seattle friends over and Anne treating us to her homemade pizza.


So that’s it!
If you aren’t already, be sure and follow Erik Curtis on YouTube. He’s new to doing videos but he’s an experienced woodworker. He put out a video showing how we built this farmhouse table in 1 day! Anne has plenty of plans to improve this deck even further.

I hope you enjoyed this one! I’ll see you on the next project.
If you haven’t already, don’t forget to sign up at the top of this page for my newsletters so you don’t miss new projects!


One Response
Awesome job on a much improved deck! ????????????????????
Comments are closed.