How to Build a Soaker Seat | Fun Outdoor Water Game!
- Outdoor DIY Projects
- April Wilkerson
- Updated: March 4, 2023
Thinking about how to build a soaker seat? Check out this DIY dunk seat project where I built a fun party game to get your friends and family soaked!
Anyone else out there having a hot summer?! I’ve got a solution for ya! Let me show yall how I made the Soaker Seat 🙂

The idea is based off the traditional dunk tanks where when somebody hits the target, the victim gets wet. But instead of falling into a tank of water, this dumps water onto the person’s head! Something like it already exist on the market, and my mom was the one to message me asking to make her one.
However, this one has some pretty sweet upgrades. It has a sturdy wooden frame that can support a built in seat annnnd a large container of water. Two flapper valves that release a lot of water when the target is hit, then even an automatic refill option so you can leave the hose on and the container will automatically start refilling for the next turn.


Ok, lets start this build. First things first is to build the frame. I made mine from 2x4s and started by cutting them down the size at my miter saw. One side is cut with an angle on it so that it will lean.

Then the other side is cut at a much steeper angle. One that is too much for my miter saw, so I cut these by hand with a circular saw.

I figured out where I wanted the angle to stop then used a straight edge to draw a line. Placing it on my Armor Tool mobile workbench, I clamped the board down then used my circular saw to make the cuts. Of course locking the casters so the work bench doesn’t move as I apply pressure.


After getting them cut I moved things to my shop floor to join them together. This will not only be outside but also around water so I used Titebond III for everything on this project since it is a water proof wood glue.

I applied a decent amount, smeared it around with a brush so it would have the highest bonding ability, then predrilled and drove in some screws. Using two different lengths to make sure they didn’t punch through the other side.

Be sure when you are joining/cutting these that they mirror one another and aren’t identical.
I quickly repeated to make another set then moved back to the miter saw to cut a few braces to length. These also have an angle cut in on both sides so that they can be attached directly to the frame and flush to the front and back. This horizontal brace will later be the bottom of the seat.

Then I also cut and screwed on another piece that will become the back. Doing to the second anything I did to the first.

Alright, I set the frame aside and started working on creating the shelf that will hold the tank….which is just a tote. I used a clamp on my miter saw wing to create a stop block since I need multiples of the same length.

I dry fitted them together at my workbench to make sure the size was correct for my tote then predrilled and joined things together. Using Titebond III again then also a few Bessey clamps to hold it together tightly while attaching.


Now to the tote….lets make a few modifications shall we. The first thing is to make a way for the water to quickly drop out of the tank. Two toilet flappers were used for this. I placed them on top, spaced them apart and traced around the base. This gave me two locations where I could drill a hole then use a jigsaw to cut out the circles.


These come with a rubber grommet that you keep on the inside, then once the flappers are in, I threaded on the nut from the outside. So that’s the bottom done, then there is what the inside looks like.


Now lets create a way for the tank to automatically refill. A floater valve achieves this. You can place it at any height you want and then the floater has an adjustment as well. I recommend placing it kinda high up, at least above the two flappers, then you can lower or raise the ball from there depending on how much water you want dumping out with each target hit.

A few more components go on the tote but lets get it up in the air first. I moved the A frames out to the clear space on my shop floor, using a hand screw clamp, clamped to the base of each one to widen the footprint so it stays upright on it’s own then started attaching the shelf to hold the tank.

To make this job easier, I first drew out a line on where I wanted the shelf to sit, then clamped a board in place to act as a ledge so I could set the shelf on. You can see I used a level just to make sure it was going on nice and straight in both directions then use more quick clamps to lock it down.


Now I want this thing to be able to be broken down come winter time so I did not use any glue here. This shelf is just attached with screws alone.

I started off with the shelf kinda low, because I honestly only thought kids would want to play on it. But as I tested out the height and my head was hitting, I figured I would move it up a bit more so anybody could comfortably have a go. So feel free to adjust this height depending on who will be using it.

Now to add a seat! This is just some 2×6 material that spans across one side to the other. Again, I wanted this to break down in winter so these boards are also only attached with screws and not glue.

Before fully attaching the back, I took one of the boards to the CNC to carve in the projects name, just to add a little somethin somethin to it.

Ok, and now back to the tote to finish out the automatic refill system. Instead of dragging a hose over to refill the tank every turn, a simple combination of plumbing fittings will allow you to hookup a hose and when the tank is emptied, the floater ball inside will open a valve and allow water to come rushing back in to start refilling. However you can see that there is a ball valve included in these parts to also give you a way to kill this feature at the tank instead of going over to the hose.

Then the last major component is a trigger. Something that will pull open those flapper valves when the target is hit. This is made from some scrap plywood with a few bolts run through it.


On one side, there is a pivoting piece of wood (this is where the target will be), then the other side has a pivoting PVC fitting.


A spring is added on because it takes a bit of strength to over come the water in the tank to pull up those valves. You can see the force of the popping here.

To keep it open! I first stuck a bracket in my SuperJaws to cut one side down some. I have a portaband so that’s what I used to make this cut but a regular hacksaw or recip saw would also do the trick.


This modified bracket is placed on the inside of the trigger board, then a eyelet is placed on the PVC right in line with it. I had to use some of my Armor clamps to hold the parts in place, but here you can see that once the eyelet is lined up to the center of the bracket hole….I’m able to set then trigger it.

To top it off I placed a matching piece of ply on this side then used a few washers and nuts to hold it all together.

I grabbed a few more PVC lengths and fittings to string together to create an arm which will hold the target out and away from the seat. Again with keeping how this will break down in winter in mind, I used a few screws on each joint instead of glue, then set the arm in place.


Here is where you can determine how far away from the frame you want the target. So if you have someone with a bad arm, you might want to place it further away from the target 🙂

After picking out a good position, I used some plumbers tape to attach it to the frame.

Now I moved down to the ground and attached the target. Again, using screws to make the connections.

Oh yeah and I painted it all. : ) I went with simple but fun colors. The white so the PVC would blend, and the blue to make the tote blend. Last thing needed was a bullseye! Since I have a CNC I quickly knocked a traditional one, painted it, then attached it to the trigger.


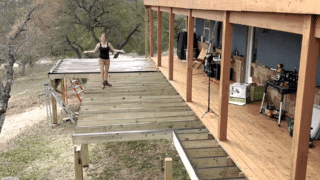
I moved the Soaker Seat outside to fill it with water and adjust the chain that runs from the trigger to the flapper valves. I ran this and made adjustments with the tank empty but the pressure from the water does change things.

And hitting this thing for the first time and watching it all work and dump the water was beyond exciting. It’s so simple, but it’s so fun!

My mom called dibs on being the first one to get dunked so the next day I moved it to a grassier area and called her over. Oh, I also switched out the bullseye a water droplet, just because I thought it was cuter…and cuteness counts. I mean just watch my Mom. I’ve watched this clip so many times and can’t help but smile.


I actually thought this was going to be a kids project, but my mom is adamant that this is also for adults! So I guess its really fun for the entire family 🙂
If you’d like plans for this DIY soaker seat project, you can find those here.
I hope you enjoyed this one as much as I have! I’ll see you on my next project!

ISOtunes Bluetooth Hearing Protection
Armor Tool Workbench
Triton Circular Saw
Mitersaw Stand
Mitersaw
Wilker Do’s DIY Plywood Workbench
Armor Dog Peg Clamps
Titebond III Wood Glue
Bessey One-Hand Clamps
Bessey K Body Clamps
Triton Jigsaw
SuperJaws
Portaband
Wilker Do’s Mallet
Water Float Valve
Float Valve Assembly (2)
2″ PVC Elbow
2″ Long turn tee
Sanitary Tee
Plastic J Hooks (2)
PVC End Caps (2)
Ball Valve
Steel Nipple
¾” MHT x ¾” MIP
PVC Elbow
Teflon thread tape


One Response
This was a fun one! ???? Awesome work April! ????????????????????????
Comments are closed.