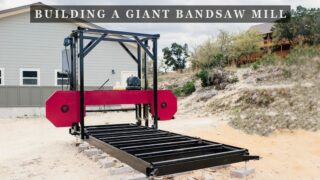
Building A Giant Bandsaw Mill | Part 2 – Making The Carriage
- Metal DIY Projects
- April Wilkerson
- Updated: March 4, 2023
Thinking about building your own giant bandsaw mill? Check out this cool DIY project where I built a giant slabbing machine!
Alright, Bandsaw Mill Part 2 here we go.
If you missed the first video where I covered all the prep work, introduced the build team, and showed building the 12’ x 6’ bed then you can check out that part here.
This video picks up right where I left off which was to start building the carriage of the bandsaw mill. This is the cage like portion that sits on top of the bed and rolls back and forth. In the future it will have the wheels, blades, and all the other components needed to slice through the log on the bed and turn it into slabs.
We used the bed of the mill itself as the work table to build the carriage and started by laying out, and clamping together the parts that will make up the first side. Those fireball squares were heavily relied on here, as well as these awesome ratcheting Bessey Clamps. These quickly became everybody’s favorite go to clamp during this build.

Even though we aren’t welding it in place right now, we went ahead and set in the center vertical member just for dry fitting purposes. Once everything was nice and locked in, JD went through and tacked all the corners in multiple places.


Next we repeated by building out the second side and you’ll see that we built this one directly on top of the first side. This not only gave us the perfect sized work surface but it also meant we just had to line up all the edges and faces to the already perfect side under it. Johnny tacked it then we all divided up to conquer different tasks while JD did his thing and welded all the corners and seams shut.

Even though all of us can weld, JD is the professional and he doesn’t only do a better job, but he can also do it quicker than any of us. So if you’re working on a team, especially if you’re use to doing everything yourself, understand everybody’s strong suits and divide up accordingly.

Another example: Since this is Matt’s design and he’s already built one, he was very much the foreman of the group and would be the one to divy up the tasks and also make sure we weren’t messing them up. Johnny, Me, and Cremona started working on the saw head beam. This is the large beam that will span across the two sides . We first needed to transfer, drill, and tap a bunch of holes to later attach a linear rail.

When punching through metal, it’s easiest to start with a smaller bit and step up to the actual size needed. So I went through first with a small bit to get the holes started, Matt followed with another bit to enlarge the hole, then Johnny followed behind him to tap them. Oh, and that knee creeper is another new thing I tried out that earned a permanent spot in my shop after this.

While we did start off power tapping the holes with a drill, it only took breaking one bit inside a hole to get us to switch to manually tapping instead. And just a tip for you if you take on something this size, make a list of all tap sizes needed and get three of each.
Next we divided up again and started prepping/making the parts needed for attaching the carriage to the bed. Matt started on welding together the housing that goes around the wheels, while I beveled parts next up to weld.

I said this in the first video but working around a professional welder was awesome. JD was great at throwing out information or advice as we were working. In this example, he saw I was using a back and forth motion to bevel with a grinder and pointed out that these flap disc actually only remove material when pulling and kindly showed me the correct technique for getting the most out of the tool. I love stuff like that.

At this point we were waiting for a lot of parts to cool down before standing the carriage up so we all kept ourselves busy with peripheral tasks. Johnny started making a plate for the motor mount. Then I worked with Matt to make a sleeve that goes on the saw head beam. This isn’t fixed in place but instead it needs just enough wiggle room to be able to slide slightly. This will later be what’s used to tension the blade. To give the plates some wiggle room, Matt taped card stock to the saw head beam before we clamped the plates into place and I tacked them down.


When it came time to weld them, JD came over and guided me through the process. Because just like anything else there is a surface level knowledge of a process which in this case is sticking two plates together, or four, but then there a deeper level of actually understanding what you’re doing, and why…and JD was great at empowering all three of us with the information he knows so well. Check out the video to hear what he says.

Even if you are experienced in something, if you have the opportunity to work with somebody with more experience or maybe even just different experience than you….try to go into the encounter with a really open mind to absorbing whatever information you can, instead of showing off what you can.
So after welding this sleeve on, we needed to remove it to get rid of that card stock underneath but it was giving us all a pretty good run for our money. JD seemed to take it a a personal challenge and while he had to work for it, he definitely busted it in the end.

At this point the wheel housings Matt made earlier were cool enough to start cleaning up so JD and I tagged teamed cleaning them up with the grinders. JD would use a cut off disc to remove the bulk of material while I used a flap disk to pretty it up some. And man… are these Armor Tool self adjusting clamps awesome! Definitely another recommend item for the shop.

As parts all over the shop were made, they wold filter into Foreman Cremona and he would set them up on the mill. You can see he is using magnets to hold things in place as well as the hardware for aligning and centering.

Then we switched off on sticking them in place. While we did use both the Lincoln Power Mig 210 and the Lincoln 260 machine, the 260 was the go to machine for this project. If you’re just starting with welding I would 100% recommend the 210 machine, but for something of this size it was nice having something a little more powerful and scaled up.
Alright, lets stand these sides up and start assembling the carriage parts. You can see JD over on the right clamping a few Fireball squares in place before we move these onto the bed. These are of course very heavy so these squares will give us a way to quickly attach the cross members to connect these two sides, once they are stood up and in the air.

Once the wheels were placed on the track JD moved a ladder to the inside and walked up the cross member to clamp in place.


Next the guys stuck two levels on the sides of the carriage and plumbed it up so that JD could tack then weld the corners in place.

And man look at this thing come together! Matt pointed out at this point that (now with a movable carriage) it was a great time to clamp on some temporary stops to prevent it from possibly being rolled right off.

We then got out of JD’s way and let him weld on the angled gussets.

As we were building this, and I was documenting in real time on Instagram, a lot of people were asking if it was going to be an indoor mill. And no it isn’t….but it is important that the carriage be built on top of the bed. With that, we built both units inside so that we wouldn’t be reliant on good weather or restricted on power outlets. This of course means we’ll have these two giant assemblies to move out separately. But know another option is to do what Cremona did and build it on site where it will live.
While JD stayed into his zone of welding, Johnny and I prepared the last two verticals of the carriage which would be attached next. These are the two joints that get a linear guide rail attached which the saw head beam will later ride up and down, which in turn adjusts the height of the blade. So they will be placed in the middle of each side of the carriage.


The guys used the help of a few fireball squares clamped into place once again while setting these in their position so they could stand these heavy verticals up then just scooch them up against the squares.
It is very important that these two rails be as perfectly in line with each other as possible and while my edit makes it look simple and quick, Matt and JD took a lot of time getting this right. I don’t know if you can see what’s going on here, so let me take a minute to point it out. They clamped a speed square to the outside face of the vertical.

Then JD placed the long level on the associated face of the second vertical.

On the inside of this level, JD is holding his laser measure so that Matt can twist their vertical until the laser mark is touching the speed square.

They’re good.
After a few high fives and chuckles over their rig, JD welded those two members in place then it was time to move this beast outside. We told JD to get after it, but apparently the man does have a limit… which is somewhere around 3,000 lbs.

So shop crane was put to use on one end while the tractor was on the other. The goal here is to just get the carriage and bed slide out far enough for the carriage to pass under my porch then be taken off and separated from the bed.

Once we got it closer though, we could see we were missing clearance by just a few inches. So we quickly removed the feet on the front half of the assembly and this bought us the clearance needed to make it all the way out.

It is nerve wracking but it’s also exciting watching such big stuff get moved. Of course having a good operator is essential for feeling confident that things will go smoothly but Cody was on the tractor and if anybody can safety move big and heavy stuff, it’s him.
The guys tilted the carriage into the bucket and you can see they wrapped a chain around the top as insurance incase it tried to get away from them. It didn’t though, they were able to just gently set her on down and then step her right off.

Then nothing fancy after that, Cody just drug it right over to where it needed to be which is about 30’ or so to the north of my shop.

Then he came back for the bed. To save my concrete porch, we used the crane to drag it off completely, then Cody grabbed a hold of the side to pick it up and haul it away. Again with those awesome rigging straps which are are dead useful folks. Ha, and you can see JD and Cremona acting as counter weights on the back of the tractor there. The bed is so heavy the back end was having trouble staying on the ground.


After Cody got the bed moved over to it’s rough position, we threaded on the feet we removed earlier then set it down. Now I’ll probably end up pouring a slab for this but for the mean time, the guys positioned a paver under the four corner feet. We finished placing a stone under each foot then threaded out each one so that it was in contact with the pavers.

Now getting the carriage back on top of the bed was a little bit more challenging. Cody attempted a few things with the tractor but quickly realized it wasn’t going to have the lift needed. No problem, he’s resourceful. He ended up moving out his gantry which was just big enough to straddle the entire bed. This meant we could use the chain hoist to latch onto the carriage and pick it right up.
Before setting the carriage was set in place all of the cross members of the bed got a 2x2x1/4″ wall tube bolted to them. Johnny and I drilled and tapped the holes using the large right angle drill made by RIDGID then secured the square tubing to the cross members using 3/8×16 socket head cap screws torqued down with this new Makita cordless impact driver. This 18 volt driver was provided to me through The Home Depot ProSpective tool review campaign. It’s a pocket sized impact driver capable of delivering 129 ft-lbs of torque which was more than enough to cinch down these tubing bolts. The motor of this drill driver has three different speed setting allowing you to fine tune the torque and RPM you’d like to operate with. Whether your driving self tapping sheet metal screws or torquing lawn mower lug nuts, this driver is right at home.

After toying around with idea of setting it in place with the tractor, Cody finally gave in to using the carriage. : )


And there we go folks, we have a rolling carriage on top of a flat bed. Way to go team. I’m proud of us.

In the next installment we will be building out and mounting the saw head beam then hopefully turning it on and making a few cuts before the guys have to head home.
Tell me what you think about the build so far down in the comments and of course check out the crew with the links I’ve left for you in the description.
See you on the next video!
ISOtunes Bluetooth Hearing Protection
Cermet Blades
Wilker Do’s Chop Saw Station Plans
Triton SuperJaws
Ridgid Octane Drill
3D Modeling Software
Plasma CNC Table
Weld Tables
Metal Marking Pencil
Lincoln Power Mig 260
Lincoln Power Mig 210
Welding Hood
Welding & Grinding Hood
Welding Jacket
Welding Gloves
Welding Cart
Cordless Grinder
Fireball Squares
Laser Measure
Bessey Quick Clamp
Bessey Duo Clamp
Bessey Rapid Ratchet Clamp (my favorite)
Bessey Small General Purpose
Bessey Inline Handle
Bessey Classic Heavy Duty
JD Brewer
Johnny Brooke
Matt Cremona
Matt Cremona’s Bandsaw Mill Plans
Watch Matt’s Video Building His Mill
(Most of the links listed above are affiliate links. As an Amazon Associate I earn from qualifying purchases.)